Gang Creation: How to Navigate Yaktribe's FREE Toolset
Alright folks, once you've signed up for Yaktribe and joined the Guild for campaign play, you need to make a Gang!
First off, make sure you are using the UNDERHIVE tools, not the NECROMUNDA tools (the latter is the older ruleset that we're not playing with):

Once you select Underhive tools, you should find a box on the left that looks like this:

You'll want to utilize "GANG MANAGER" in order to, um, manage your Gang.
From there, you can either scroll through and select your Gang by photo, or use this handy drop-down box:

You'll need to make sure to give your Gang a name at this time. If you don't have a name in mind, use a placeholder and you can edit it later.
Once you've selected your Gang (I've picked a Cawdor Gang going by the street name of "Test Gang" for this tutorial), you should get a screen that looks like this:

You'll see a number of tabs at the top: DETAILS, TERRITORIES/RACKETS, STASH, and NOTES. You won't really need to worry about too many of these right away (Territories and Rackets come into play once we're in a campaign, and Notes are 100% optional if you want to add background and such to your Gang's entry), but let's look at what happens if we click the Edit button at the bottom of the Details tab:

This is where you can re-name your Gang if you want to.
DOMINION TYPE should be the type of Gang you're playing, and should be auto-filled; ignore it.
DOMINION TYPE should be the type of Gang you're playing, and should be auto-filled; ignore it.
CAMPAIGN will list which campaign this Gang is active in, and will remain blank until I add you to the campaign.
CREDITS are where you can manually add your credits once you've earned them after a battle...don't feel free to reward yourself with free credits!
CREDITS are where you can manually add your credits once you've earned them after a battle...don't feel free to reward yourself with free credits!
MEAT is for the Uprising Campaign type, which we are not using at this time. If and when we get there, this is where you'll add any "meat" you earn...
REPUTATION is where you'll add/subtract any gains or losses to your Reputation, which is used to help score you rarer items in the Trading Post.
REPUTATION is where you'll add/subtract any gains or losses to your Reputation, which is used to help score you rarer items in the Trading Post.
ALIGNMENT is for the Law & Misrule Campaign type, which we are not using at this time. If and when we get there, this is where you'll select your Alignment, which may change during the campaign...
ALLEGIANCE is for the Uprising Campaign type as well. If and when we get there, this is where you'll select your Allegiance, which may change during the campaign...
GANG STATUS simply denotes where this Gang is Active or Retired. By default, it should be Active, and isn't really anything to worry about unless you decide to retire this Gang and start a new one.
GANG COLOR is completely optional, but you should totally select one! When the campaign is underway, you'll actually get to see a map of your Territories, which will be color-coded with your Gang's color! It's pretty neat...use the drop down and pick one:

Now, we probably ought to add some Fighters to this Cawdor Gang!
Back under "Gang Controls" on your right side, click on "Add Fighter" to get this dialogue box to pop up:

From there, you'll want to select your Fighter type to add to the Gang.
(PLEASE NOTE: DO NOT ADD "SPECIALIST" FIGHTERS TO YOUR GANG! "Specialists" are a special type of Fighter that are in your Gang when a regular Ganger rolls up a "Specialist" Advance when they spend XP. This may change with the release of future supplements, but for now, ignore that option.)
Like the Gang name, you can use a placeholder name for your Fighter if you don't have a good name in mind just yet.
Once you've generated your Fighter, you should get a profile like this to appear:

A Cawdor Leader named Leader!
Clicking on the "pencil" icon on the far right of a Fighter's profile will bring up a new screen that looks like this:

We'll cover all of these areas in time. For now, check out the section that says "Equipment" and click on this "pencil" icon next to it. Doing so should bring up a section to add or purchase weapons and wargear from your Gang's House List.

From there, you can use the drop down arrows to see more detailed listings of what your selected Fighter can purchase (your available credits will show at the top of the menu):

To purchase an item with credits (which you should be doing 99.9% of the time), simply click on "BUY" to deduct the credits from your Stash and add the item to your Fighter. NOTE: "ADD" gives an item to a Fighter for FREE, which should only be done with the express permission of the Arbitrator or a game rule that provides free equipment.
On this screen, you'll see that next to "Flak Armor" there's a "1" next to it, indicating that the Fighter already owns/is equipped with it. With any non-Weapon item a Fighter has, they have the option to "Sell" the item back to the Trading Post (at a reduced value) or to place it in the Gang's Stash for later assignment to another Fighter; this occurs most commonly when a Fighter upgrades their armor, dumping the old armor into the Stash for assignment to, say, a Juve that does not come equipped with their own armor.
On this screen, you'll see that next to "Flak Armor" there's a "1" next to it, indicating that the Fighter already owns/is equipped with it. With any non-Weapon item a Fighter has, they have the option to "Sell" the item back to the Trading Post (at a reduced value) or to place it in the Gang's Stash for later assignment to another Fighter; this occurs most commonly when a Fighter upgrades their armor, dumping the old armor into the Stash for assignment to, say, a Juve that does not come equipped with their own armor.
After purchasing a piece of equipment (Leader has chosen to buy an Axe), the Fighter's profile is updated accordingly:

Pretty nifty, huh?
Yaktribe understands that there are limitations to your Gang's starting House List/roster/etc. As an example, here's what a Juve (named "Juve") can purchase at their creation:
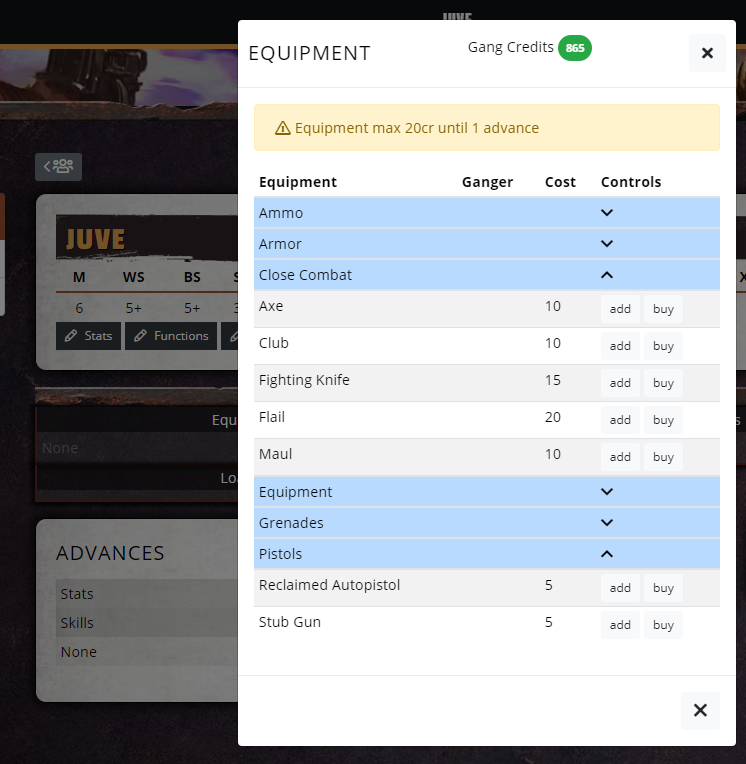
See how Juve's equipment options are limited to only the items they can afford (20 creds or less) and from categories they're allowed to purchase from (i.e. no Basic or Special weapons)? Some of those restrictions will be lifted once you buy their first Advance, which we'll cover shortly.
Back to Leader, you'll notice that below Leader's Wargear section, his profile indicates that he's missing his starting Skill (available to Leaders and Champions upon initial recruitment). Let's look at the rest of the screen to see how to remedy this:

There are TWO places that mention that the Fighter needs a starting Skill...but which one do you use?
The answer: under the white box labeled ADVANCES. The darker box labeled SKILLS merely displays what Skills a Fighter has, and should only be modified whenever the Arbitrator allows it...do NOT use that "pencil" icon!
Instead, click that "plus sign" icon in the white ADVANCES box to generate this dialogue box:

Your first Advance is free, but further Advances will cost XP, as determined by the Fighter's type (Leader/Champion/Juve vs Ganger...see rulebook for more details). If you have the requisite amount of XP available (if you've been adding it in properly after your battles...), Yaktribe's system will allow the purchase!
However, we're not worried about Advances at this point, merely adding your Fighter's starting Skill. Click the drop-down menu to scroll through and select the Skill you want (sorted alphabetically by Skill Tree name, like Agility, Leadership, Shooting, etc).
PLEASE NOTE THAT AT THIS TIME YAKTRIBE DOES NOT "KNOW" YOUR GANG'S STARTING SKILLS, SO YOU WILL NEED YOUR HOUSE LIST FROM THE APPROPRIATE BOOK TO KNOW WHICH SKILLS ARE YOUR PRIMARY SKILLS.

Once you have selected your starting Skill (Leader has chosen to take the Leadership Skill "Commanding Presence"), simply click on "Buy Advance" and it will be added to your Fighter's profile:

Look, it appears in both spots!

And here it is on the profile on the main page!

Now, we've talked about adding XP to buy Advances, but how exactly do you do that? Well, go back onto your Fighter's edit screen, and look at the top under the Fighter's stat line:

Simply click on "Add XP" to add the number of XP your Fighter has earned after the last battle. Yaktribe will keep a running total of how much XP your Fighter currently has to spend, in addition to how much XP they've earned over time.
The button next to "Add XP" (labeled "Functions") is your other important item on this part. Click on it to access a sub-list of functions:

EDIT KILLS: This is where you'll head to add to the kill tally of enemy Fighters that this Fighter has taken OOA with a direct action...seems simple enough.
EDIT ADVANCES and EDIT XP: Really, you shouldn't have to use these at all, but if you messed something up, here's how to fix it without deleting the entire Fighter!
CHANGE TYPE: When a Ganger becomes a Specialist, a Juve promotes up to a Champion, or a Champion takes over the Gang as the Leader because the old Leader has DIED (perish the thought!), this is where you'll make those changes.
CHANGE NAME/LABEL: Really, you only need to worry about changing the Fighter's name, like so:

Our fearless Leader ("Leader") now has an actual name ("An Actual Name")!

Lastly, on your Fighter's edit page, you'll have a few more options:

STARVE FIGHTER: This is a function of the Uprising Campaign type, so don't worry about it.
SELL TO GUILDERS: Use this button to mark that your Fighter has been Captured by another Gang; if later Rescued, this can be undone by clicking on the "RESCUE FROM GUILDERS" option that should replace the "SELL TO GUILDERS" button.
DELETE FIGHTER: This is a function used to simply delete a Fighter from your roster, such as if you're making up a test roster or making changes to your starting roster. Otherwise, if a Fighter dies during or after a battle, use...
KILL FIGHTER: Kills the Fighter...duh. But also leaves a record of the Fighter on your roster so that you can honor his/her memory (or as a reminder to loot their locker later...they don't need those coins anymore...)
SEND INTO RECOVERY: This is a function to indicate that your Fighter is not available for the next battle. After they miss a battle and fully recover, the replacement button "RECOVER GANGER" will allow you to move this Fighter back to active duty.
HISTORY: This will show you EVERY action that has been taken on this Fighter's card. It's also how an Arbitrator can tell if you've been making illegal modifications...

On your Gang's overall roster, there's a similar History function, so you can't pull any fast ones!

But let's look at some of those other functions that are useful, like ADD HIRED GUN/PETS:

From here, you can purchase Hired Guns and Pets (duh), but this also includes Brutes and Hangers-on. You'll have to remember a few things, though:
1) Hive Scum are only around for a single battle, so remove them accordingly.
2) Bounty Hunters and Dramatis Personae are only around until certain conditions are met, so remove them when that happens.
3) Yaktribe, at this time, is unaware that a Cawdor Gang, for example, isn't able to purchase an Escher Khimerix, so make sure that you are only shopping for the things/people you're allowed to purchase/recruit.
Next up, let's look at the TRADING POST, the lifeblood of a campaign:

You'll notice that there are two sliders for Rarity and Legality.
RARITY: Once you determine the Rarity Level you're allowed to shop for (based on Reputation and Post-Battle Actions taken by Leaders and Champions), you can adjust the slider accordingly to filter out anything that is over what you're allowed to purchase.
LEGALITY: When the Black Market is available, this functions just like the Rarity slider, but for Illegal items. As the Black Market is unavailable for the first part of our campaign, simply take that slider and throw it all the way to the left!
Realistically, though, since both Pre and Post-Battle Actions are meant to be witnessed by another party (your opponent, an Arbitrator, or anyone who knows what you're even doing), you'll write this down on paper and simply come here to shop later (unless you're able to get on Yaktribe remotely, in which case AWESOME!).
Like the initial equipment purchases, use the drop-down menus to go shopping and use the "$" to purchase the item from the list:

An Actual Name has decide to purchase a Lasgun from the Trading Post, perhaps because he's suffered a head injury or something? In any event, the item, once purchased, goes into your Stash. Remember that tab from earlier? Check it out now:

Once you're in the Stash tab, click on "EDIT" to assign the item to a Fighter. Since Juve is still too new to understand how to hold a rifle, we'll give it to An Actual Name so that he can shoot when he's not within Axe range:

Once assigned, the item appears on your Fighter's profile:

Lastly, let's cover PRINT FUNCTIONS:

If you don't have access to roster sheets or Fighter cards from a starter set, fear not! Yaktribe's got your back! You can print up a roster (Gang Sheet) or the Fighter cards (Gang Cards) which you can use during your games:

Rosters are great for tracking overall stats, like Gang Rating and Reputation. Plus, whenever a Fighter makes a qualifying kill or earns in-game XP, it's a great place to mark that down.

Fighter cards are 100% needed for this version of Necromunda, since Fighters are sometimes randomly selected for missions. This is a handy way of getting all of your hard-typed data from Yaktribe's website to print (though you'll need to cut them out manually once you've printed them).
Warning: for Weapons with multiple Traits, sometimes Yaktribe cuts off those other Traits, so you'll have to hand-write them on the Fighter's card.
Comments
Post a Comment